

When introducing new fish, shrimp, snails, or invertebrates into your aquarium, one of the most critical steps is acclimation. Fish and other aquatic life are highly sensitive to changes in water chemistry, and skipping this process can lead to shock, stress, or even death. Among the various methods available, aquarium drip acclimation stands out as one of the safest and most effective ways to ensure that your new livestock adjusts smoothly to its new environment
In this comprehensive guide, we will dive deep into the importance of drip acclimation, how it works, step-by-step instructions, the science behind it, common mistakes to avoid, and expert tips for success. Whether you are a beginner setting up your first freshwater tank or an experienced aquarist managing a reef aquarium, mastering drip acclimation will significantly improve the survival and health rates of your aquatic pets
What is Aquarium Drip Acclimation?
Aquarium drip acclimation is a method used to gradually introduce new fish or invertebrates to the water conditions of your aquarium. Instead of placing the new animal directly into your tank or floating its bag for a short time, drip acclimation slowly mixes aquarium water into the container holding the new arrival. This gradual process allows the fish to adjust to differences in temperature, pH, salinity, hardness, and other chemical parameters without experiencing stress
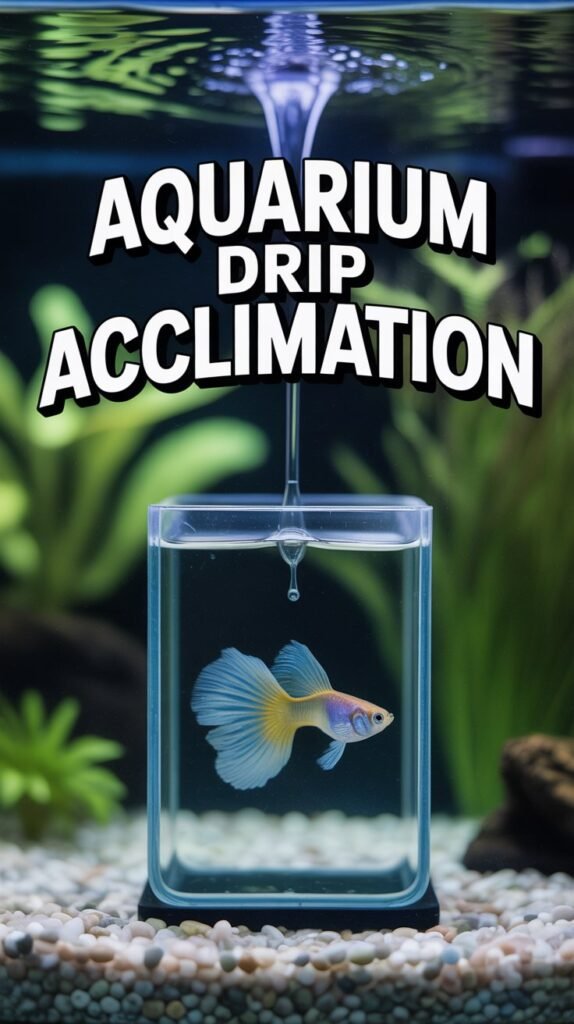
The drip acclimation method uses gravity and airline tubing to drip water at a controlled pace, usually one to two drops per second, from the main tank into a bucket or container where the new animal is kept. Over the course of 30 minutes to 2 hours, the water in the container becomes nearly identical to the aquarium water, creating a smooth transition
Why is Drip Acclimation Important?
When you buy fish or invertebrates from a pet store or online, they are packaged in water that often has very different parameters from your home aquarium. Even small shifts in pH, temperature, or salinity can shock the animal’s system. For sensitive species such as shrimp, corals, or saltwater fish, the difference can be fatal
Some of the major reasons why drip acclimation is important include:
- pH Adjustment: Sudden changes in pH are stressful and harmful. Gradual acclimation prevents “pH shock”
- Salinity Balance: In marine and brackish tanks, salinity differences between bag water and aquarium water can cause osmotic stress
- Temperature Stability: Although floating bags equalizes temperature, drip acclimation also helps reduce micro-changes that matter for sensitive species
- Hardness and Minerals: Freshwater aquariums often differ in KH (carbonate hardness) and GH (general hardness), which affect osmoregulation in fish
- Ammonia Management: During shipping, fish release waste that raises ammonia levels in the bag. Opening the bag exposes the water to oxygen, making ammonia more toxic. Drip acclimation dilutes this gradually
By giving your fish or invertebrates time to adapt, you drastically reduce stress levels, improve their immunity, and ensure a higher survival rate
When Should You Use Drip Acclimation?
While some hardy fish can tolerate a quick acclimation, drip acclimation is strongly recommended in several situations:
- Marine Fish and Invertebrates: Saltwater animals are extremely sensitive to salinity and pH changes
- Freshwater Shrimp: Species like cherry shrimp, crystal shrimp, and Amano shrimp are fragile and need slow acclimation
- Snails and Other Invertebrates: Nerite snails, mystery snails, and crabs benefit from drip acclimation to avoid osmotic shock
- Delicate Freshwater Fish: Discus, neon tetras, and other sensitive species require careful acclimation
- New Corals and Anemones: Corals rely on stable water chemistry, making drip acclimation essential
- Wild-Caught Fish: These fish are less adapted to captivity and more vulnerable to stress
In general, whenever you bring home new aquatic life, especially if it traveled a long distance, drip acclimation is a wise precaution
Equipment Needed for Drip Acclimation
Setting up a drip acclimation system does not require expensive tools. Most aquarists can do it with a few basic items:
- Clean Bucket or Container – Use a dedicated fish-safe bucket, ideally one that has never been exposed to soap or chemicals
- Airline Tubing – Standard aquarium tubing works perfectly to create the siphon
- Flow Control Device – This can be a simple plastic valve, knot in the tubing, or a purpose-made drip acclimation kit
- Aquarium Water Source – The drip line will draw water directly from your main tank
- Fish Net – For safely transferring fish from the container to the tank
- Towel or Lid – To prevent fish from jumping out during acclimation
Optional tools like suction cups or clamps make setup easier, but they are not necessary for success
Step-by-Step Guide to Aquarium Drip Acclimation
Now let’s go through the process in detail.
Step 1: Prepare Your Setup
Place a clean bucket or container near your aquarium. Open the bag containing your new fish or invertebrate and gently pour its contents, including the shipping water, into the bucket. Make sure the bucket is large enough so the animal has room and won’t be stressed
Step 2: Start the Siphon
Take your airline tubing and create a siphon from your aquarium into the bucket. You can start the siphon by sucking gently on one end of the tubing or using a siphon starter. Position the tubing so gravity allows water to flow into the bucket
Step 3: Control the Flow
Tie a loose knot in the tubing or use a valve to slow the flow until it drips at a steady pace of one to two drops per second. For very sensitive species, you can reduce it to one drop every two seconds
Step 4: Allow Gradual Mixing
Let the water drip into the bucket until the volume doubles. This usually takes 30–60 minutes, depending on the drip rate. For extremely sensitive species like shrimp or marine invertebrates, you may extend acclimation to two hours
Step 5: Transfer the Animal
Once the water in the bucket closely matches the aquarium water, use a net to gently transfer the fish or invertebrate into the main tank. Never pour the bucket water into your aquarium, as it may contain harmful substances or pathogens
Step 6: Dispose of Bag Water
Discard the leftover shipping water safely. Do not reuse it in your aquarium
Common Mistakes to Avoid
Even though drip acclimation is straightforward, many aquarists make errors that compromise its effectiveness. Here are common mistakes to watch out for:
- Skipping Acclimation Entirely: Placing fish directly into the tank causes extreme stress
- Adding Store Water to the Aquarium: Bag water may contain ammonia, disease, or parasites. Always discard it
- Rushing the Process: Fast acclimation defeats the purpose. Be patient, especially with delicate animals
- Overexposing to Ammonia: Once a bag is opened, ammonia becomes more toxic. Start drip acclimation promptly
- Not Matching Temperature First: If bag water is much colder or warmer, float the bag for 15–20 minutes before starting drip acclimation
- Using Dirty Equipment: Any chemical residue in buckets or tubing can harm fish
Benefits of Drip Acclimation
The advantages of drip acclimation go beyond simply preventing shock. Some of the key benefits include:
- Higher survival rates for new arrivals
- Reduced stress and faster adjustment to the new environment
- Stronger immune systems, lowering disease risk
- Longer lifespan and healthier fish overall
- Better compatibility with tank mates due to calmer behavior
Ultimately, investing an extra hour in drip acclimation saves money, time, and the heartbreak of losing a new pet
Tips for Successful Drip Acclimation
- Use a Lid: Cover the acclimation bucket to prevent jumping fish
- Dim the Lights: Lowering aquarium lighting reduces stress during introduction
- Monitor Behavior: If fish appear extremely stressed, reduce drip speed
- Quarantine First: If possible, acclimate new arrivals into a quarantine tank before adding them to your display aquarium
- Have Patience: Take your time. Acclimation is not a step to rush
Freshwater vs Saltwater Drip Acclimation
Although the principle is the same, freshwater and saltwater aquarists should consider some unique factors
- Freshwater Tanks: pH, hardness, and temperature are the main parameters to match. Hardy species like guppies or mollies may not require long acclimation, but sensitive species such as discus or shrimp benefit greatly
- Saltwater Tanks: In addition to pH and temperature, salinity is critical. Corals, anemones, and invertebrates like snails are especially vulnerable. Drip acclimation is almost always required for marine livestock
The Science Behind Drip Acclimation
Fish and invertebrates regulate internal salt and water balance through a process called osmoregulation. When moved to water with different chemistry, their cells can swell or shrink rapidly, leading to osmotic shock. Drip acclimation gives their bodies time to adjust gradually to the new balance
Additionally, sudden pH changes interfere with respiration and metabolic processes. Temperature shifts can affect enzyme activity and immune function. By slowing the transition, drip acclimation reduces physiological stress and increases survival
Conclusion
Aquarium drip acclimation is a vital practice for any aquarist who values the health and longevity of their aquatic pets. Whether you keep freshwater shrimp, delicate discus, or exotic saltwater corals, taking the time to acclimate properly makes all the difference. By using a simple drip system, you protect your new arrivals from shock, stress, and unnecessary death. With patience, attention to detail, and proper equipment, you can ensure a smooth transition for every new addition to your tank
FAQs About Aquarium Drip Acclimation
1. How long should drip acclimation take?
The process usually takes between 30 minutes and 2 hours. Sensitive species like shrimp and marine invertebrates should be acclimated longer, while hardy fish may need less time
2. Can I use drip acclimation for all fish?
Yes, although hardy species like guppies or goldfish may survive without it, drip acclimation is always the safer choice
3. Should I add bag water into my aquarium?
No. Bag water may contain ammonia, chemicals, or disease. Always discard it after acclimation
4. Do I need special equipment for drip acclimation?
Not necessarily. Basic airline tubing and a bucket are enough. However, drip acclimation kits can make the process easier
5. Is drip acclimation necessary for plants?
Most aquarium plants are hardy and don’t require drip acclimation, but rinsing them to remove pesticides or snails is recommended
6. Can I acclimate multiple fish at once?
Yes, as long as the bucket is large enough and the species are compatible. Be sure not to overcrowd during acclimation
7. What happens if I skip acclimation?
Skipping acclimation increases the risk of stress, shock, or death, especially in sensitive fish and invertebrates
8. Is drip acclimation the same as floating the bag?
No. Floating the bag only matches temperature. Drip acclimation adjusts pH, hardness, and salinity as well
9. Should I feed fish right after drip acclimation?
No. Wait a few hours before feeding to allow them to settle into their new environment
10. Can drip acclimation be used for quarantine tanks?
Yes. In fact, it is best to drip acclimate new fish into a quarantine tank before moving them to your main aquarium