
If you’re setting up a saltwater or reef aquarium, a sump system is one of the best investments you can make for the long-term health and stability of your tank. A reef sump design is not just about hiding equipment; it’s about improving water quality, increasing oxygenation, and creating a stable environment for corals and fish.
A well-designed sump can turn an average reef tank into a thriving, self-sustaining ecosystem. This comprehensive guide explores the purpose, components, and step-by-step design of a reef sump—helping both beginners and experienced reef keepers understand how to create an efficient, quiet, and reliable filtration system.
What Is a Reef Sump?
A reef sump is a secondary tank or compartment, typically located beneath the main aquarium, used to house filtration equipment and increase the total water volume of the system. It works as the heart of a reef tank’s filtration setup—improving water quality and allowing hidden management of equipment like heaters, skimmers, and reactors.
Water from the main display tank drains into the sump, passes through various filtration chambers, and is then pumped back into the display. This continuous cycle maintains optimal water clarity and chemical balance.
Why Is a Sump Important in Reef Aquariums?

Reef aquariums are delicate ecosystems that require pristine water quality and stability. A sump provides multiple benefits that make maintenance easier and the environment healthier.
1. Increased Water Volume
A sump increases the total volume of your aquarium system, diluting toxins and stabilizing parameters like pH, temperature, and salinity.
2. Better Filtration
You can install multiple types of filtration—mechanical, chemical, and biological—in the sump without cluttering the display tank.
3. Equipment Storage
Heaters, skimmers, and probes can be hidden in the sump, improving aesthetics and safety.
4. Easy Water Changes
Water changes are simpler since you can drain and refill the sump without disturbing the main tank.
5. Improved Oxygen Exchange
Water turbulence in the sump increases gas exchange, promoting higher oxygen levels for fish and corals.
6. Flexibility for Add-ons
Reactors, refugiums, and auto top-off (ATO) systems can all be integrated easily into a sump.
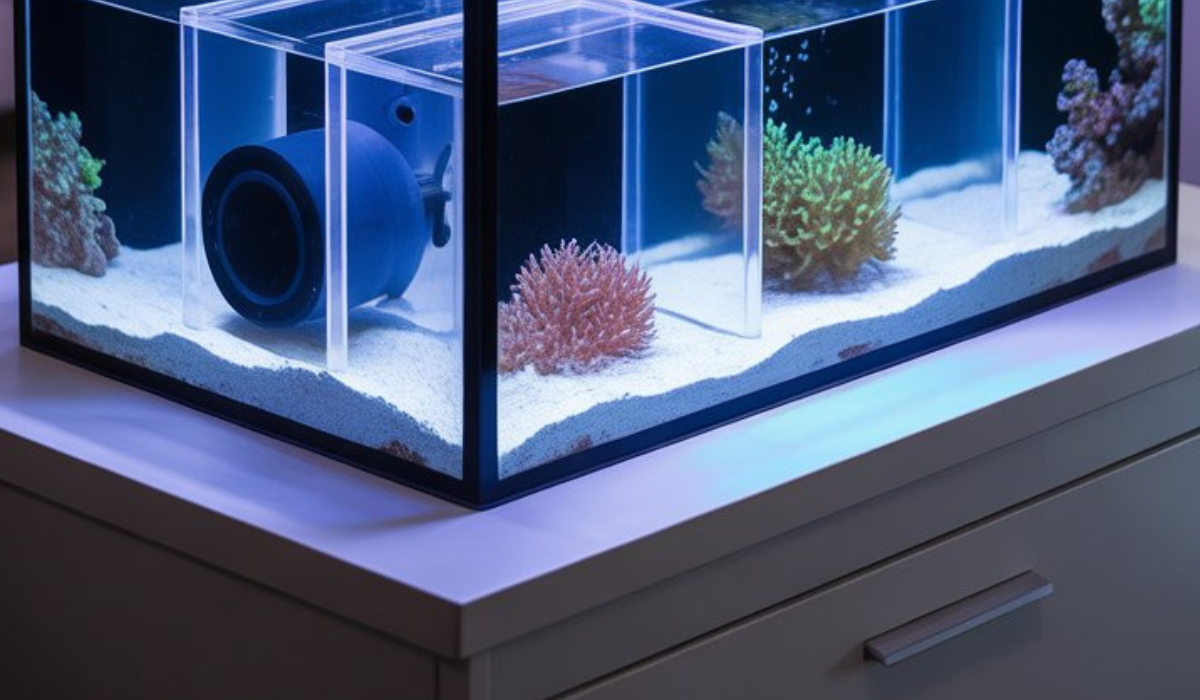
Basic Components of a Reef Sump Design
A successful reef sump design includes several interconnected sections that perform specific functions. Let’s break down each one.
1. Drain Section
This is where water from the main tank enters the sump. It usually includes:
- Filter socks or rollers for mechanical filtration.
- Bubble traps to prevent air bubbles from entering the return pump.
- Adequate space to handle overflow or backflow when the pump is turned off.
2. Protein Skimmer Section
The skimmer chamber is next. The protein skimmer removes dissolved organic compounds before they decompose, helping maintain low nitrate and phosphate levels.
This chamber should have a constant water level (usually 7–9 inches deep) for optimal skimmer performance.
3. Refugium Section
A refugium is a section dedicated to growing beneficial algae (like Chaetomorpha) and housing microorganisms such as copepods and amphipods.
It plays a vital role in nutrient export by absorbing nitrates and phosphates.
4. Return Section
The final chamber contains the return pump, which sends clean, filtered water back to the display tank.
This chamber must maintain enough water volume to prevent the pump from running dry and to handle evaporation changes.
5. Baffles
Baffles are glass or acrylic dividers that direct water flow between chambers, control water height, and trap bubbles.
A three-baffle system is common between the skimmer and return section to minimize microbubbles.
Planning Your Reef Sump Design

Designing a reef sump involves careful planning to ensure all components work harmoniously. Let’s go step-by-step.
1. Determine Tank Size
Your sump should be at least 25–40% of the display tank’s total volume.
For example:
- 75-gallon reef tank → 25–30-gallon sump
- 125-gallon reef tank → 40–50-gallon sump
This volume helps accommodate water backflow during power outages and ensures stable chemistry.
2. Choose the Right Material
Most sump tanks are made of glass or acrylic:
- Glass: More affordable and scratch-resistant.
- Acrylic: Easier to drill and customize, but can scratch more easily.
3. Flow Rate and Pump Sizing
Your return pump should circulate the tank’s total volume 5–10 times per hour.
For instance, a 100-gallon tank should have a return pump rated for 500–1000 gallons per hour (GPH).
Also, consider head height (the vertical distance from sump to display). Pumps lose flow power with height, so choose a slightly higher-rated pump to compensate.
4. Water Path Design
The typical flow layout is:
Drain → Mechanical Filtration → Skimmer → Refugium → Return Pump
Some aquarists prefer the refugium before the skimmer, but most find the above order optimal for nutrient control and clarity.
5. Water Level Management
Each sump section should maintain a specific water depth:
- Skimmer chamber: 7–9 inches
- Refugium: 8–10 inches
- Return chamber: Deep enough for pump operation but not too high to overflow during power cuts.
6. Emergency Overflow Considerations
Always leave room in the sump for extra water from the display during power outages. Test your system to ensure no flooding occurs.
Reef Sump Filtration Types
A reef sump combines three main filtration types, each essential for water purity.
1. Mechanical Filtration
Removes visible debris and particles using:
- Filter socks
- Filter rollers
- Sponges or pads
Clean or replace them regularly to prevent nitrate buildup.
2. Chemical Filtration
Uses absorbent media like:
- Activated carbon – removes toxins and discoloration
- GFO (Granular Ferric Oxide) – controls phosphate levels
- Zeolite – absorbs ammonia and other impurities
Media reactors can be installed in the sump for efficient chemical filtration.
3. Biological Filtration
Beneficial bacteria colonize surfaces like:
- Live rock rubble
- Bio balls or ceramic media
- MarinePure blocks
These bacteria convert toxic ammonia and nitrites into less harmful nitrates, completing the nitrogen cycle.
Adding a Refugium to Your Reef Sump
A refugium is a powerful natural filtration addition. It helps control nutrients while providing food for corals and fish.
1. Lighting
Refugiums need light for macroalgae growth. Use a dedicated refugium light with a spectrum between 5000K–6500K for best results.
2. Macroalgae Selection
Common macroalgae choices include:
- Chaetomorpha: Fast-growing and nutrient-absorbing.
- Caulerpa: Effective but must be trimmed to prevent spreading.
- Gracilaria: Attractive and edible for herbivorous fish.
3. Substrate and Rock
You can add a layer of live sand or small pieces of live rock for microfauna colonization.
4. Flow Rate
Refugiums benefit from slow water flow, allowing more contact time for nutrient absorption—typically 3–5 times per hour of the refugium’s volume.
Noise Reduction and Bubble Control

Sumps can be noisy if not properly designed. Here’s how to keep them quiet.
1. Use Durso or Herbie Overflows
These plumbing designs minimize gurgling by balancing air and water flow.
2. Install Bubble Traps
A three-baffle bubble trap between the skimmer and return sections prevents microbubbles from reaching the display.
3. Add Foam or Silencers
Foam around the drain pipe or a silencer cap can dampen noise.
4. Keep Return Pump Submerged
Ensure the return pump is fully underwater to avoid splashing or vibration noise.
Advanced Reef Sump Features
For high-end systems or large tanks, additional sump features can enhance performance and automation.
1. Auto Top-Off (ATO) System
Replaces evaporated water automatically using freshwater from a reservoir. Keeps salinity stable.
2. Media Reactors
Dedicated chambers or external reactors for GFO, carbon, or bio-pellets improve water clarity and nutrient removal.
3. UV Sterilizer
Mounted in-line with the return, UV sterilizers kill algae spores, bacteria, and parasites.
4. Dosing Equipment
Automated dosing pumps can add calcium, alkalinity, and magnesium supplements for coral growth.
5. Filter Rollers
An automated version of filter socks that continuously rolls clean filter material into place, reducing maintenance.
Maintenance Tips for Reef Sumps
- Clean Filter Socks Weekly: Replace or rinse them to prevent nitrate buildup.
- Skimmer Maintenance: Clean the skimmer cup and neck regularly for maximum efficiency.
- Test Parameters: Check salinity, pH, and nutrients weekly.
- Top Off Water Daily: If you don’t have an ATO, manually top off to maintain levels.
- Vacuum Detritus: Remove debris that collects at the sump’s bottom during water changes.
- Inspect Pumps: Clean impellers every few months to prevent blockages.
Common Mistakes in Reef Sump Design
1. Ignoring Overflow Capacity
A sump that’s too small to handle backflow during a power outage will flood—always plan extra capacity.
2. Poor Baffle Placement
Incorrect baffle spacing can cause uneven flow, bubbles, and noise.
3. Overcomplicating the Design
Simple is often better. Avoid unnecessary chambers or plumbing unless you need them.
4. Neglecting Refugium Flow
Too much flow through the refugium reduces nutrient export efficiency.
5. Inadequate Return Chamber Size
If the return section is too small, evaporation will quickly expose the pump, risking damage.
DIY Reef Sump Design Example
Let’s look at a typical DIY 40-gallon reef sump layout for a 100-gallon display tank:
- Chamber 1 (Drain/Filter Section):
- Size: 10 inches wide
- Equipment: Filter sock holder, drain pipes
- Water depth: 9 inches
- Chamber 2 (Skimmer Section):
- Size: 12 inches wide
- Equipment: Protein skimmer, heater
- Water depth: 8 inches
- Baffle System:
- Three baffles spaced 1 inch apart to trap bubbles
- Chamber 3 (Refugium):
- Size: 10 inches wide
- Equipment: Macroalgae, refugium light, live rock rubble
- Water depth: 10 inches
- Chamber 4 (Return Section):
- Size: 8 inches wide
- Equipment: Return pump, ATO sensor
This design balances mechanical, biological, and chemical filtration while maintaining quiet, efficient flow.
Benefits of a Proper Reef Sump Design
- Improved water clarity and nutrient control
- Stable water chemistry and temperature
- Hidden equipment for a cleaner display
- Increased oxygenation and pH balance
- Easy maintenance and modular upgrades
Frequently Asked Questions (FAQs)
1. What size sump do I need for my reef tank?
Ideally, your sump should be 25–40% of your display tank’s size. For example, a 100-gallon reef tank should have a 30–40-gallon sump.
2. Can I use a freshwater sump for a reef tank?
Yes, but it must be modified for saltwater use. Ensure materials and seals are marine-safe.
3. Do I need a refugium in my sump?
While not mandatory, refugiums improve nutrient export, stabilize pH, and support beneficial microorganisms.
4. How often should I clean my sump?
Clean filters weekly, skimmers biweekly, and perform a full sump cleaning every few months to prevent detritus buildup.
5. What is the best water flow for a reef sump?
Aim for 5–10 times the display tank’s volume per hour, depending on your corals and equipment needs.
6. Should the refugium be before or after the skimmer?
Either works, but placing the refugium after the skimmer often ensures cleaner water and better algae growth.
7. How do I make my sump quieter?
Use a Herbie or Durso overflow, add bubble traps, and keep your pump submerged.
8. Can I build my own sump?
Absolutely. Many aquarists DIY their sumps using spare tanks, acrylic sheets, and silicone baffles.
9. What’s the ideal water depth for a skimmer section?
Most protein skimmers operate best in 7–9 inches of water.
10. How does a sump prevent flooding?
A properly sized sump has enough space to hold water that drains back from the display when the return pump stops.
Conclusion
A well-planned reef sump design is the foundation of a healthy and stable reef aquarium. It enhances water quality, hides equipment, and allows flexibility for advanced filtration and automation.
By understanding sump components, flow design, and maintenance practices, you can create a system that not only supports coral and fish life but also simplifies aquarium management. Whether you choose a simple setup or an advanced system with reactors and refugium, a sump is an investment that pays long-term dividends in reef health, clarity, and beauty.